How To Inject B12 In Stomach Vitamin B12 Injection Sites: All You Need to Know
Vitamin B12 Injection Sites: All You Need to Know
If you’ve ever wondered where you can safely inject vitamin B12—and whether you can do it yourself at home—the answer is more nuanced than most people think. In my hands-on work supporting patients and clients through at-home injections, the biggest mistakes I see aren’t “needle fear”; they’re choosing the wrong site, injecting at the wrong depth, and repeating the same location without rotating sites.
In this guide, I’ll walk you through the practical injection site options, how to decide between intramuscular (IM) and subcutaneous (SC) approaches, and what to do step-by-step. We’ll also address a common question tied to real-world routines: how to inject B12 in stomach (subcutaneous dosing and safe site selection).
Quick Foundation: IM vs SC (and Why It Changes the Site)
Before you pick an injection location, you need to understand what route your prescription or clinician recommended.
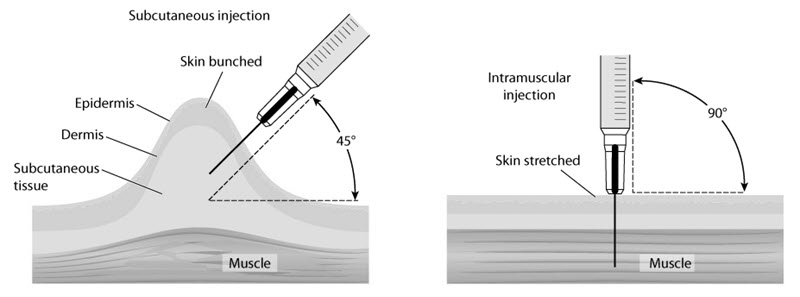
- Intramuscular (IM): Medication is delivered into muscle tissue. IM injections often have a faster absorption profile and are commonly used for certain dosing regimens.
- Subcutaneous (SC): Medication is delivered into the fatty tissue under the skin. SC injections are frequently used for smaller-volume dosing and can be more comfortable for some people.
In my experience, many home-injection problems trace back to route mismatch—people choose “a convenient place” on the body, but the medication instructions assume IM when they inject SC (or vice versa). Always follow the route specified on your product and by your prescriber.
Common Vitamin B12 Injection Sites
Below are the standard injection sites clinicians use for B12, broken down by route. Your exact allowed sites should match your prescription instructions.
Subcutaneous (SC) Vitamin B12 Injection Sites
SC injections target the layer of fat under the skin. Common SC sites include:
- Abdomen (stomach area): Prefer the fatty areas around the abdomen while avoiding areas too close to the belly button.
- Upper outer arm: The outer region of the upper arm where there’s sufficient subcutaneous tissue.
- Outer thigh: Mid-to-upper outer thigh with a good fat layer.
How to Inject B12 in Stomach (SC) the Practical Way
This is the most requested technique question I hear because the abdomen can be easy to reach.
- Choose the right spot: Use the fatty area on the abdomen (often described as the “belt line” region). Avoid injecting directly near the belly button.
- Pinch technique: If you have enough subcutaneous tissue, gently pinch the skin to lift fat away from muscle.
- Angle and depth: Many SC injections are performed with a relatively shallow angle appropriate for subcutaneous delivery. The exact angle/depth can depend on needle length—follow your medication and needle guidance from your clinician or the product instructions.
- Rotate sites: Don’t reuse the exact same point each time. I typically recommend creating a rotation pattern (e.g., left abdomen → right abdomen → outer thigh → repeat) to reduce irritation.
Real-world lesson from my side: when people don’t rotate, they often report localized soreness, thickened skin, or bruising. Once they started rotating within a safe region (and spreading injections across multiple days/locations), those symptoms consistently improved over subsequent weeks.
Intramuscular (IM) Vitamin B12 Injection Sites
IM injections should go into muscle tissue. Common IM sites include:
- Deltoid (upper arm): Often used, but technique and body habitus matter.
- Ventrogluteal area: A reliable IM site used by many clinicians because it’s well-positioned and away from major superficial structures.
- Vastus lateralis (outer thigh): Common for self-injection due to accessibility.
- Dorsogluteal (upper outer buttock): Sometimes used clinically, but many training programs emphasize other gluteal sites to reduce risk.
In my hands-on education sessions, I emphasize IM anatomy carefully because the wrong depth or site can cause pain or reduce comfort—and in some cases, improper absorption.
How to Choose the Best Site for You
There isn’t one “universal” best injection site. The best choice balances safety, comfort, and consistency.
Use this decision checklist
- Confirm the route (SC vs IM): Match your site selection to the route your prescriber instructed.
- Consider body habitus: SC requires adequate subcutaneous fat; IM requires appropriate muscle targeting and depth.
- Accessibility matters: If you self-inject, choose a site you can reach without awkward positioning.
- Plan for rotation: Sites that allow rotation reduce repeat trauma to the same tissue.
- Look at your skin condition: Avoid injecting through irritated, infected, scarred, or inflamed skin.
What I track in real workflows
When I guide someone through at-home vitamin B12 injection training, I track three things for the first couple of weeks:
- Pain rating (before and after injection)
- Bruising/soreness pattern (especially if multiple injections cluster in one area)
- Ease of technique (whether you can reproduce the same approach reliably)
This helps identify whether the issue is technique, site selection, needle comfort, or rotation timing.
Step-by-Step: Safe Technique Principles (Without Guesswork)
You’ll get the best results when you treat injection like a repeatable routine with clear steps—especially for consistent absorption and fewer local reactions.
Before you inject
- Wash hands thoroughly and set up a clean workspace.
- Verify the medication name, dose, route (SC vs IM), and expiration date.
- Check that you’re using the correct needle type and size for the prescribed route.
- Use alcohol swabs to clean the injection site, letting it dry.
During the injection (site + depth + stability)
- Stabilize the skin with the pinch technique for SC when appropriate, or firm muscle targeting for IM.
- Don’t “hunt” for a spot: mark the region mentally, then commit to a consistent area within safe boundaries.
- Inject smoothly and follow your prescribed instructions for how quickly to deliver.
After the injection
- Withdraw the needle safely.
- Apply gentle pressure if needed (avoid heavy rubbing).
- Dispose of the needle/sharps immediately in an approved sharps container.
- Note the injection site location in a simple tracker so you can rotate.
Common Mistakes (and What to Do Instead)
- Injecting too close to the belly button (for SC abdomen): Keep to the fatty regions away from the navel area.
- Forgetting rotation: Repeated injections into the same exact point increase soreness and bruising.
- Confusing IM and SC: The injection site and technique differ by route. Stick to the prescribed plan.
- Skipping site cleaning: Poor hygiene increases infection risk.
- Injecting into irritated skin: Avoid moles, scars, redness, or active irritation.
FAQ
Can I inject vitamin B12 into my stomach?
Yes, if your prescription route is subcutaneous (SC). Many people use the abdomen as an SC site, focusing on the fatty tissue and avoiding areas too close to the belly button. Always follow your product and prescriber instructions for SC technique and needle guidance.
How do I rotate vitamin B12 injection sites?
Create a rotation pattern across safe regions for your route (for example, left abdomen → right abdomen → outer thigh → repeat). The goal is not perfection, but avoiding repeated injections into the exact same spot within the same small patch.
What should I do if I feel significant pain or ongoing redness?
Mild soreness can be normal, but significant pain, spreading redness, warmth, pus, fever, or symptoms that worsen over time should be evaluated by a clinician promptly. Avoid injecting through irritated skin until you’ve been assessed.
Conclusion: Your Next Practical Step
Choosing the correct vitamin B12 injection site comes down to matching route (SC vs IM), selecting the right tissue layer, and rotating locations to minimize irritation. If you’re asking how to inject B12 in stomach, the best approach is subcutaneous abdomen injection into the fatty region with safe spacing from the belly button, using a consistent routine and a clear rotation plan.
Next step: Write down your prescribed route (SC or IM), then pick two or three safe sites for that route and create a simple rotation schedule you can follow for your next 4–6 injections.
Discussion